How to build dynamic web apps by mastering the Document Object Model (DOM).
Learn how to make web pages interactive and dynamic

Documenting my coding journey, sharing thoughts and helping beginner programmers remove the frustration with copy-paste JavaScript code without understanding
In this article, you will learn how to use the Document Object Model (DOM) to connect and manipulate the elements of a web page to make it dynamic.
At the end of this article, you will learn:
What the DOM is
Understand the DOM Tree
How to select, create, add, and remove elements from a web page
Styling a web page using JavaScript
Traversing the DOM
Event handling in the DOM etc
We will use this knowledge to create a basic web app, called "Hey Buddy", that enables you to create and access the contact details of your favorite buddies.

Prerequisite
Before getting started, you will need to be familiar with
Basic HTML
Basic CSS
Basic JavaScript
Introduction
Websites consist of static HTML and or XML documents. Being static, you need an approach to make them lively and functional.
You may want to change the background color of a specified content on the web page when the user hovers over it.
You may also want to validate a form whenever a user enters a piece of information, warning the user of any incorrect input.
You may even want to expand an image when the user hovers it.
These interactivities are made possible when you have access to the elements on the web page.
How do you access these elements? Whenever a HTML document is loaded in a web browser, the browser models the HTML document into a structure.
With this structure, you can use a programming language like JavaScript to access and modify the various elements in the HTML document.
Whenever any section of the HTML document is modified with JavaScript, the web page reloads to reflect the changes.
This approach enables developers to add interactivity and control the elements in any HTML file making websites dynamic and functional.
In the next section, you will learn about the Document Object Model.
What is the DOM?
Whenever a web page is displayed in a browser window, the browser depicts everything on the page (heading, paragraph, images, links, text, etc) as objects. These objects represents the structure and content of every element on the website, and is generally referred to as the Document Object Model (DOM).
The Document Object Model (DOM) is a tree-like representation of the content of the web page.
It enables you to use a programming language such as JavaScript to change the content, style, and structure of web pages to make them dynamic and functional.
The DOM and JavaScript
Whenever a web page is loaded, the browser creates a Document Object Model (DOM) of the page. This means, every element on the web page is represented as an object, and these objects act as a link between JavaScript and the web page.
Because every element on the web page has been represented as an object, you can use JavaScript to interact with the elements on a web page.
The elements that will be depicted as object could be any of the below:
Content: these include text, video, and images on the web page.
Structural elements: These include,
div,section,bodyetc that forms the main structure of the HTML document.Attributes: Every element on the web page has attributes, such as
class,placeholder,sizeetc.
JavaScript can now be used to:
add, change, and remove any of the HTML elements and attributes
add or change any of the CSS styles
add, update, or delete the content on the website
handle events such as clicking a button.
The DOM is not a programming language, however, without it, the JavaScript language will have no idea of how to interact with a web page.
It is the DOM that gives JavaScript the superpower to access and manipulate the structure, content, and appearance of a web page.
In the next section, we will explore how an HTML document is represented as the DOM
The Document Object
The actual page loaded in the browser window is represented in JavaScript by the Document object. You can use this object to manipulate the HTML and CSS of the web page.
The basic elements of a HTML document are:
A text header, represented with the
<h1>,<h2>,<h3>,<h4>,<h5>,<h6>tags.A paragraph, represented with the
<p>tag.An image, represented with the
<img>tagA divider, represented with the
<div>tag etc
You can refer to these elements in the DOM, and because each element is an object, it can be accessed using JavaScript, to enable you to modify the web page.
Modifying the web page entails changing the text content, applying new styles to it, creating new HTML elements and adding them to the current element as children, or even deleting elements on the web page.
To achieve the above, the DOM comprises a set of APIs listed in the Document object. It has properties, methods, and events useful for manipulating and creating web pages.
For instance, the Document.documentElement property helps us to refer to any HTML element on the web page. Again, the document.body is an object representing the <body> element, you can use this method to manipulate the body of the HTML document.
Soon we’ll learn more ways to manipulate the DOM, but first, we need to know about its structure.
Understanding the DOM tree
Whenever the HTML document is loaded in the browser window, the DOM structures the HTML file like a genealogical tree or family tree.
In a family tree, at the top you have the grandparents, followed by your parents and their siblings, then you and your siblings and cousins.
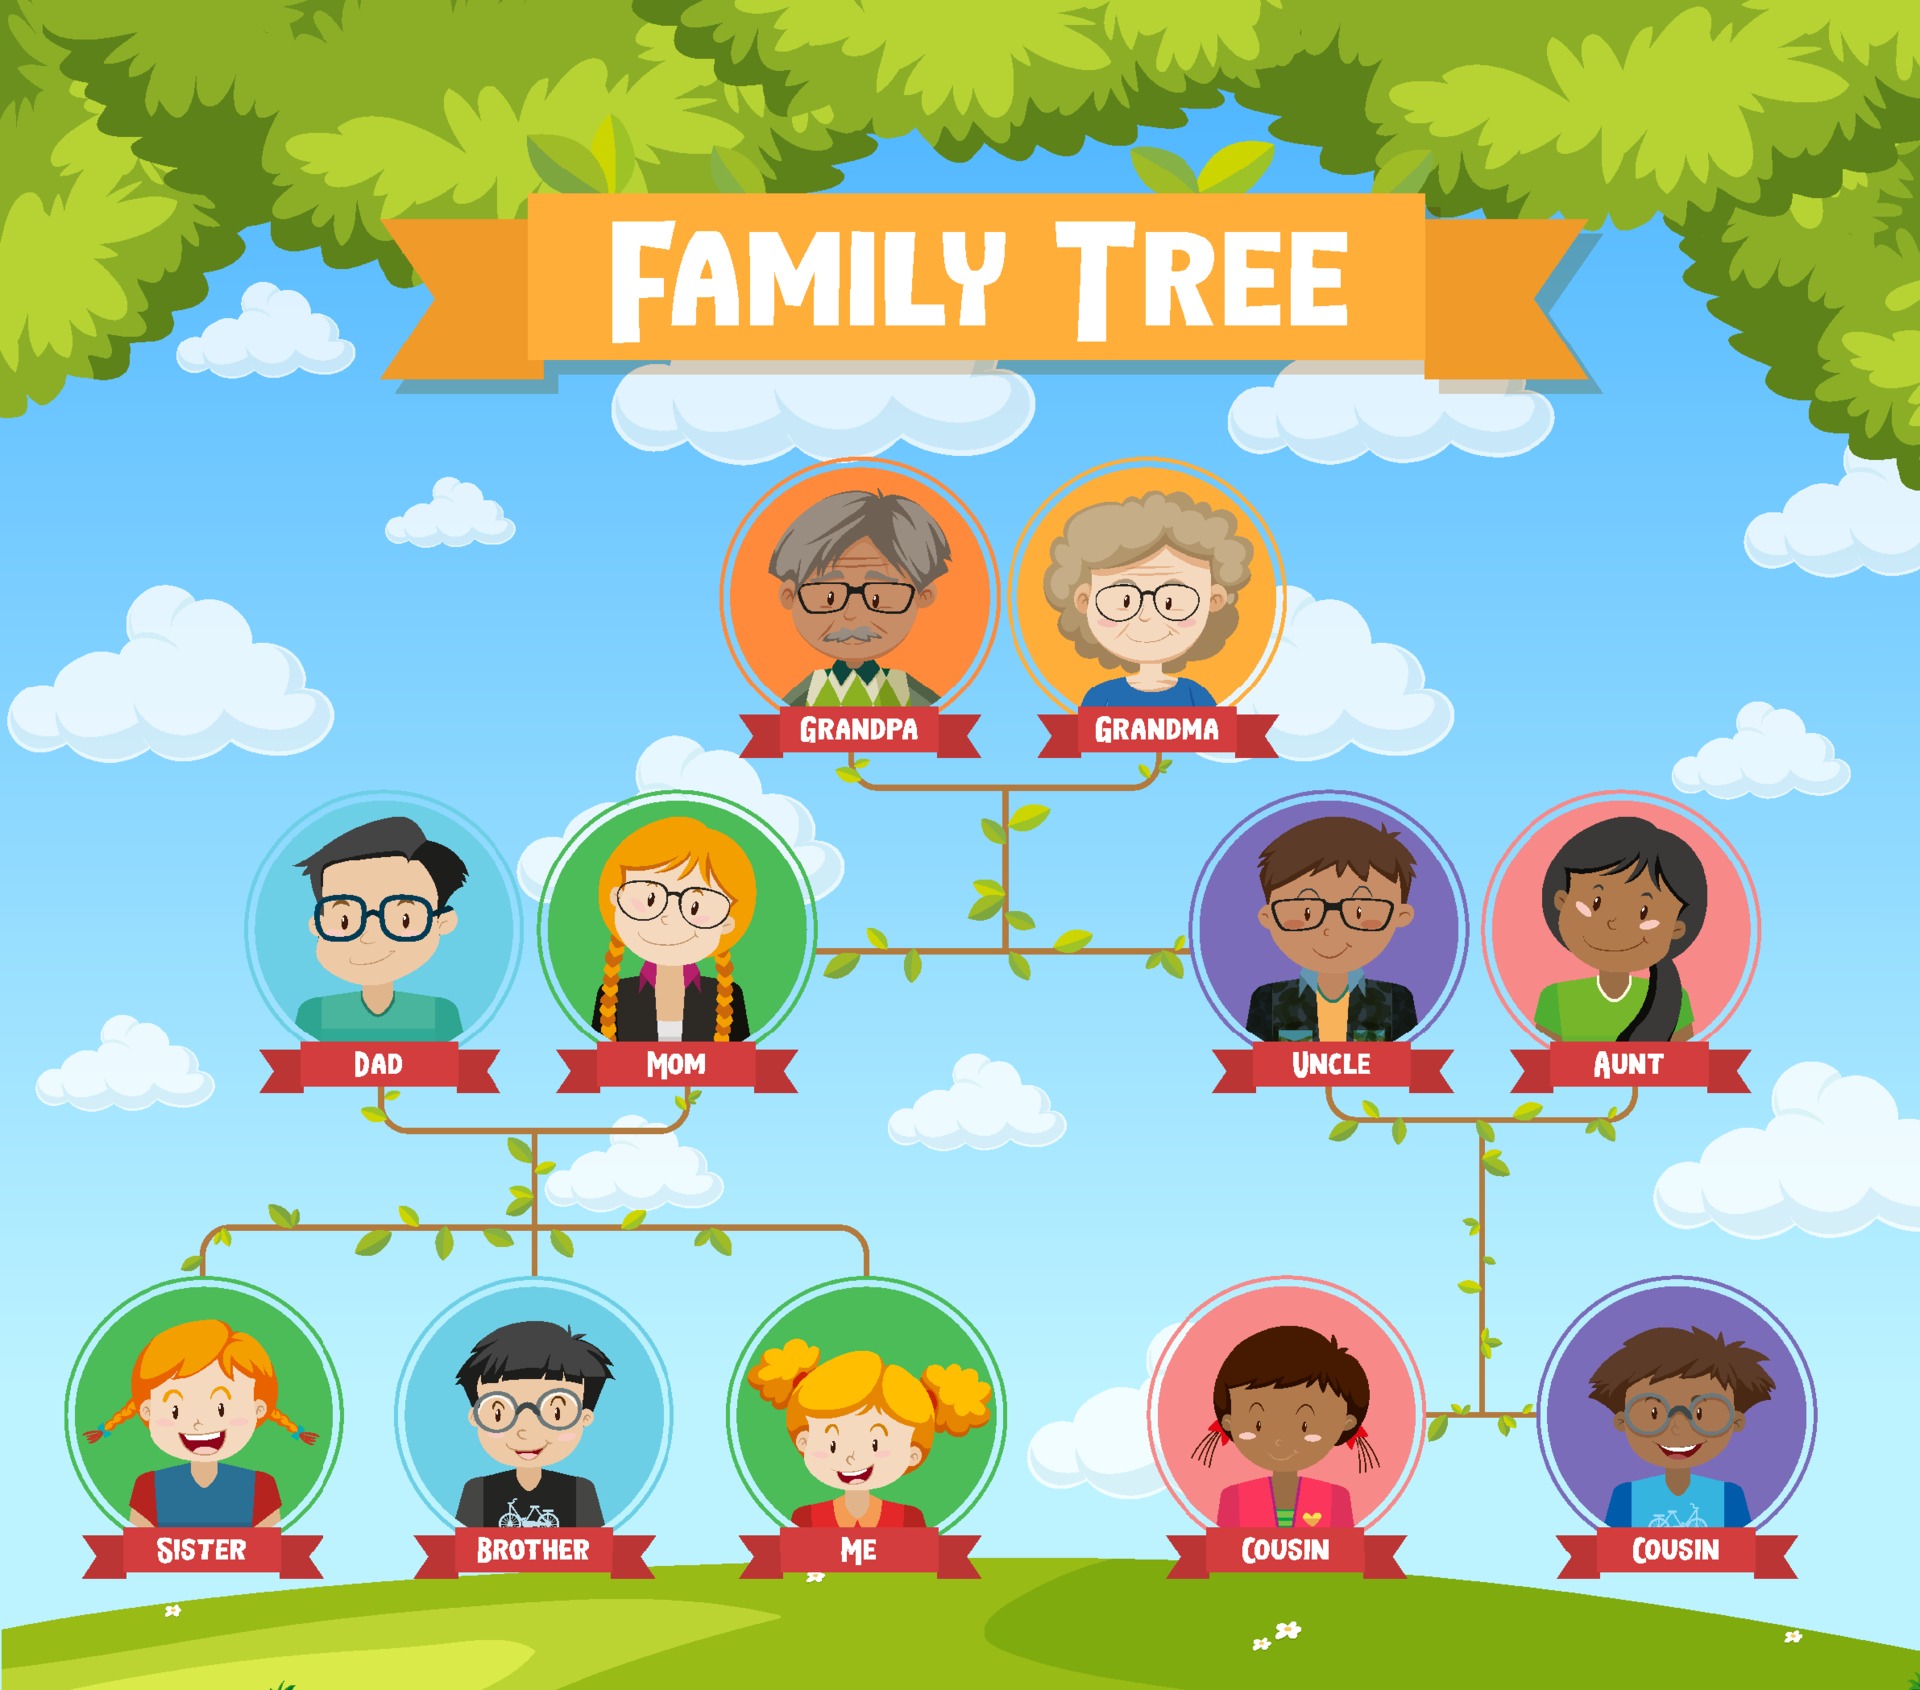
Similarly, the DOM will represent all the elements in the HTML document like a family tree structure. Each entry in the tree is a node, and each node contains an element on the web page.
The majority of nodes in a DOM tree will be Element and Text nodes. The nodes in the node tree have a hierarchical relationship to each other.
Every tree begins with the root node, beneath, you would have head and body elements. Below the body elements, you may find the header, main and footer elements.
Consider the HTML source code below:
<!doctype html>
<html>
  <head>
    <title>DOM Manipulation</title>
  </head>
  <body>
    <h1>What is DOM</h1>
    <p>This article explain what the DOM is</p>
    <p>DOM allows you to manipulate web pages</p>
    <button>View DOM </button>
  </body>
</html>
The diagram below illustrates the DOM derived from the HTML above

Referencing the image above:
Each blue and yellow circle in the diagram represents a
node. The blue represents an element node whilst the yellow represents a text node.Every tree begins with the root node, which is the
htmlelement. From the rootnode, you can branch into other nodes.Whenever a node, has another node inside it, the initial node is called a parent node. From the above,
htmlis the parent node because we have theheadandbodynodes under it. Alsobodyis the parent node ofh1,p,pandbuttonelements.A child node is a node directly inside another node:
h1,pandbuttonare child nodes ofbodyA sibling node is a node that sits on the same level in the DOM tree. For instance, all the blue circles in the same level are sibling nodes:
headandbodyare siblings, as well ash1,p,pandbuttonA node anywhere inside another node is the Descendant node
Whenever there is content in each node, it will be represented as
#text(as displayed in the yellow circle). A text node contains only a string. It may not have children and is always a leaf of the tree. For instancetitleelement has the textDOM manipulationThe entire HTML document is represented by the
documentobject (a node as well)
Exploring the DOM using the Developer tools
You can explore the DOM using the developer tools in your browser, by right-clicking on a webpage and selecting "inspect" in the context menu. Using the icon below in the left-upper corner, you can choose a node from the webpage and inspect it.


This gives access to the DOM element in addition to the styling applied to the element. You can interact with any of the elements, and apply styling and that change will reflect on the web page.
Even though you can find elements using the developer tool, it is not preferred.
In the next section, you will learn how to find an element in the DOM.
Finding Elements in the DOM
You can access the DOM elements using the ID, class, tag and selectors .
The methods for accessing elements are:
document.getElementById(id)document.getElementsByTagName(tagName)document.getElementsByClassName(className)document.querySelector(cssSelector)document.querySelectorAll(cssSelector)
In the next section, you will use the above methods to find any element in the HTML document.
Using the getElementById() method
The getElementById() finds an element in the HTML document with an assigned ID. Since element IDs are required to be unique, it provides a way to access a specific element quickly.
The syntax is as below
document.getElementById('ElemId')
Supposing in our HTML document you have an element with an id firstPara.
For instance:
<p id="firstPara"> Let's begin with the frist paragraph </p>
In the JavaScript file, you can access the element with that id (firstPara) and manipulate it.
//index.js

//access element with id firstPara
const para = document.getElementById('firstPara')
Using the getElementsByTagName() method
You may want to find all the paragraphs in an HTML document.
The getElementsByTagName() method searches the document and returns a collection of elements with the given tag name.
The syntax is as below:
document.getElementsByTagName(name)
Let's find all the p tags in the index.html document below
<html>
<head>
 <title> Locating Elements </title>
</head>
<body>

    <div id="div1">
      <p>Some div1 text</p>
      <p>Some div1 text</p>
      <p>Some div1 text</p>
    </div>
    <p>Some outer text</p>
    <p>Some outer text</p>

</body>
</html>
//  access the p's in the index.js
const allPara = document.getElementsByTagName('p')
- Because you want to access all the
pelements, you use theptag as the tag name hencedocument.getElementsByTagName('p')
Using the getElementByClassName() method
The getElementByClassName() method allows you to locate an element with the specified class name(s). It returns an array-like object of all child elements which have all of the given class name(s).
The syntax is as below:
document.getElementsByClassName(names)
Usage
Get all elements that have a class name of
containerin the HTML document.document.getElementsByClassName('container')
Get all elements that have a class name of
containerandwrapperin the HTML documentdocument.getElementsByClassName('container wrapper')
Using the querySelector() method
The document.querySelector() returns the first element within the document that matches the specified CSS selector. If no matches are found, null is returned.
The syntax is as below
document.querySelector('.myClass')
Let's assume in the code snippet below, you want to access an element with the class name container
<html>
<head>
 <title> Locating Elements </title>
</head>
<body>
    <section class="container">
    <h1>Learning Basic DOM Manipulation</h1>
    <p>This demonstrates how to find elements</p>
    </section>

</body>
</html>
// access element with class of container
const secContainer = document.querySelector('.container')
Importance of finding elements in the DOM
Whenever you find elements using the methods above, you can improve functionality on web page either by changing the content, styling the element or adding an event listener to it.
Creating HTML elements
Developing the user interface of websites involves adding new elements to the HTML document. These elements can be a button, an image, a paragraph, or a heading.
In this section, you will learn how to create elements in your JavaScript file and join them to other elements to help create user interfaces. For instance, you can create a paragraph element and attach a button to it.
Use the document.createElement() method to create an HTML element. The method accepts the HTML tag as an argument
The syntax is as below:
//index.js
document.createElement(tagName)
The tagName specifies the tag to be created for instance div, button, paragraph, etc.
Let's create a heading, paragraph. button and div elements in our JavaScript file using the syntax above
//index.js

//create div element
const div = document.createElement('div')
//create a heading element
const headingOne = document.createElement('h1')
//create a paragraph element
const paragraph = document.createElement('p');
//create a button element
const btn = document.createElement('button')
Whenever an element is created, you can use the innerText property to add or get the text content within the element.
The example below adds the content to theheadingOne, btn and paragraph elements
//add content to the elements
headingOne.innerText = "Learn DOM Manipulation"
paragraph.innerText = 'Learn how to create and attach elements to the dom'
btn.innerText = 'Read More'
Adding elements to the HTML document
After creating an element, you need to add it to the parent element to gradually build the user interface. The appendChild() method helps you with that.
The method adds a node to the end of the list of child nodes or a specified parent node
The syntax is as below:
parentNode.appendChild(childNode)
- The
childNodeis the element to attach to theparentNode
Let's attach the paragraph , headingOne, and btn elements to the div (parent node )
//attach elements to the parent node
div.appendChild(headingOne) // attach headingOne to the div
div.appendChild(paragraph) // attach paragraph to the div
div.appendChild(btn) // attach btn to the div
Next, access the body of the HTML document and attach the div to the body
document.body.appendChild(div)
The output is as below:

Moving and removing elements from HTML Documents
In the previous section, you learn how to gradually build the user interface of a web page by creating and adding elements to the DOM.
In this section, you will learn how to move and remove elements in the DOM.
- The
appendChild()enables you to move an existing child node to a new position within the document.
In the index.html below, you have two unordered lists with id's listOne and listTwo respectively, you can move the first item in listOne (i.e HTML) to be positioned after the last item in listTwo (i.e MongoDB)
<ul id="listOne">
    <li>HTML</li>
    <li>CSS</li>
    <li>JS</li>
</ul>

<ul id="listTwo">
    <li>React</li>
    <li>Tamagui</li>
    <li>MongoDB</li>
</ul>
Let's learn how to achieve that:
const firstList = document.querySelector('#listOne')
// select the first item in the list
const firstItem = firstList.firstElementChild

//find the second list
const secondList = document.querySelector('#listTwo')
//move the firstItem in listOne to end of listTwo
secondList.appendChild(firstItem)
The output is as below:

- To remove a node from its parent, use the
Node.removeChild()
In the example below, you can remove all the items from listOne from the body node.
const bodyNode = document.querySelector('body')

const lists = document.querySelector('#listOne')
// remove the lists from body;
bodyNode.removeChild(lists)

Adding and getting the content of an element
Use the methods below to read and add content to an element
element.textContentelement.innerTextelement.innerHTML
The textContent property returns all the text contained by an element and all of its descendants including spaces and CSS hidden text, except the tags
In the code below, you can get the content of the h1 element
<body>
  <div>
    <h1 class="heading">This is heading one</h1>
  </div>
</body>
const h1 = document.querySelector('.heading')
console.log(h1.textContent)
Output
"This is heading one"
If you prefer to rather add text content to the element, you can do:
const h1 = document.querySelector('.heading')
//adding new text to the h1
h1.textContent = "New heading"
- The
innerHTMLproperty gets or changes the HTML markup of an element
The syntax below can be used to read the content of an element
let content = element.innerHTML;
In the example below, you want to get the HTML markup contained in the the ul.
<ul id="itemContainer">
    <li>HTML</li>
    <li>CSS </li>
</ul>
Below is how it will be implemented in our JavaScript file using the innerHTML property.
const items = document.querySelector('#itemContainer');

console.log(items.innerHTML)
The output will be
<li>HTML</li>
 <li>CSS </li>
Use the syntax below to set or change the content of an element
element.innerHTML = 'new contant';
In the code below, you can get the content of the p element
 <div>
    <p class="para">This is a paragraph</p>
  </div>
const paragraph= document.querySelector('.para')
console.log(paragraph.innerHTML)
Output
"This is a paragraph"
- The
innerTextproperty can also be used to write dynamic text on the html document. Here, text will not be interpreted as html text but a normal text. The syntax is as below
element.innerText = "new content:
Styling elements with JavaScript
It is possible to manipulate CSS styles with JavaScript. The general approach is to add inline styles directly onto the elements you want to style.
Let's take a look at how to achieve that.
Inline styling of elements
Using the HTMLElement.style syntax, you have access to an object containing all the CSS properties (color, background color, font size, font weight, etc)
For instance, to change the color of an element to red, you use the color property and assign the value.
The syntax is as below:
HTMLelement.style.color = 'red'
If there are hyphens (
-) in the CSS property to use, for instances-webkit-text-stroke, you can use the array-like notation ([]) to access the property.If there is one hyphen (
-) in the property, for instancebackground-color, you should write it asbackgroundColor
See the examples below:
HTMLelement.style.['-webkit-text-stock'] = 'unset';
HTMLelement.style.backgroundColor = 'red'
In the example below, we changed the background color of the first item in our previous unordered list to red;
//select first list
const firstLists = document.querySelector('#listOne')

firstLists.style.backgroundColor = 'red'
The output is as below:

Styling HTML elements with setAttribute() method.
The setAttribute() assigns value to an attribute on a specified HTML element.
The syntax is as below:
HTMLelement.setAttribute(name, value)
It accepts two arguments name and value
The
namerepresents the attribute you want to set on the HTML elementThe
valueis a string containing the value to assign to the attribute.
You can use the setAttribute() to apply a specified class on an HTML element.
See the example below,
<!--index.html !-->
<!DOCTYPE html>
<html>
<head>
  <meta charset="utf-8">
  <meta name="viewport" content="width=device-width">
  <title>JS Bin</title>
  <style>
     .container {
    color: #fff;
    font-size: 25px;
    background-color: #764248;
    padding: 10px;
    width: 250px;
  }
  </style>
</head>
<body>
 <ul id="listOne">
    <li>HTML</li>
    <li>CSS</li>
    <li>JS</li>
</ul>

<ul id="listTwo">
    <li>React</li>
    <li>Tamagui</li>
    <li>MongoDB</li>
</ul>
</body>
</html>
The
index.htmlfile above contains a.containerclass that list all the CSS properties to apply to the HTML element.In the example below, you select the HTML element to apply the styling
Using the
setAttribute()method. You specify the attribute to set on the element, which in our case will be aclassand then specify thevalueto apply on theclasswhich will be the.containerCSS declaration
Let's select the body of the HTML document and style it using the CSS declaration in the .container
const bodyElem = document.querySelector('body')
//apply the .container styling on the class attribute
bodyElem.setAttribute('class', 'container')
The output is as below:

In the next section, you will learn how to find elements in the DOM based on their relation to other elements.
Traversing the DOM
Occasionally, you need to search upwards, downwards, or even sideways to locate elements. This is referred to as Traversing.
Traversing refers to "moving through", and it is the process of finding elements in the DOM tree based on their relation to other elements.
Traversing involves starting with one selection and moving through that selection until you reach the elements you desire.
Using methods like document.querySelector(), document.getElementById() , you can access elements in the DOM tree. The limitation of using these methods is that they perform a full search of the DOM tree in order to locate an element.
Wouldn't it be easier to locate a node by moving from one element to another element compared to the full search?
Why DOM Traversing
Assuming you want to visit the nearest pharmacy in your neighborhood, what will be the fastest and most effective way to get there?
If you already know the location of the pharmacy, you can move from your house directly to the pharmacy.
Alternatively, you can search for the location of the nearest pharmacy on Google Maps, then follow the given directions.
Moving from your house to the neighboring pharmacy is the most effective and recommended approach. This analogy is equivalent to traversing the DOM, selecting one element from a neighboring element.
If you look up the address of the nearest pharmacy using Maps, you are using the equivalent of document.querySelector to find elements (i.e performing a full search which is ineffective)
Whenever you have access to a given node in the DOM tree, you can access its related node in three directions:
Downwards
Sideways
Upwards
Traversing downwards
The two methods to traverse downward are:
querySelectororquerySelectorAllchildren
Using the selector method to traverse downwards
Use the element.querySelector or element.querySelectorAll method to traverse downwards from a specified element.
You locate a starting point (element) and then use the querySelector() method on the starting element to move downwards to the required element.
For instance in the code below, to locate the h1 element, you start from the section and move downward.
<!DOCTYPE html>
<html>
<head>
  <meta charset="utf-8">
  <meta name="viewport" content="width=device-width">
  <title>JS Bin</title>
</head>
<body>
  <section class="container">
    <h1 class="heading">Travesing Downwards </h1>
  </section>
</body>
</html>
// select the section element
const sect = document.querySelector('.container');
// move downwards to find the neighbouring h1 element in relation to sect
const headingElem = sect.querySelector('.heading')
//output
 <h1 class="heading">Travesing Downwards </h1>
Let's understand the code above
We used the
document.querySelector('.container')to specify the element to start searching from.Now, that we have access to the starting point, we can move down to the required element using the
sect.querySelector('.heading')
The output is as below:
<h1 class="heading">Travesing Downwards </h1>
Traversing downwards using the children or childNodes properties
The
childrenproperty selects all child elements that are immediately nested in another element.It returns a live
HTMLCollectionthat contains all of the child elements.Because the
HTMLCollectionis anarray-likeobject, you can use the bracket notation to select the required item.
In the example below, you have a list of fruits, with each item nested in the ul
<body>
<ul class="fruit_list">
  <li>Mango</li>
  <li>Apples</li>
  <li>Avocado</li>
  <li>Pineapple</li>
  <li>Oranges</li>
</ul>
</body>
Below, you can move downwards and select li 's from the ul using the children property
const list = document.querySelector('.fruit_list')
// using the children property to access all nested elements
const listItems = list.children

console.log(listItems) // returns a HTML collection
console.log(listItems[3]) // access the third item from the collection
The output is as below:

Traversing Upwards
You can also move up the DOM to find elements. The two methods to navigate up the DOM are:
parentElementclosest
Using parentElement to traverse upwards
The parentElement allows you to move to the selected element's parent node one level up.
In the code below, we select the ul and move one level up to the parent element ( div)
<body>
<div class="fruit_container">
<ul class="fruit_list">
  <li>
    <a href="#">Mango</a>
  </li>
  <li>
    <a href="#">Apples</a>
  </li>
  <li>
      <a href="#">Avocado</a>
   </li>
  <li>
    <a href="#">Pineapple</a>
  </li>
  <li>
    <a href="#">Oranges</a>
  </li>
</ul>
</div>
</body>
const list = document.querySelector('.fruit_list')
//move one level up to the parent
const parentElem = list.parentElement;

console.log(parentElem)
// display the div element
// <div>...</div>
Traversing upwards using the closest property
The closest property selects an element multiple levels above the current element.
The search begins from the current element, then moves up until it reaches the document. During the process, whenever it reaches the element to find, it stops and returns the element.
The syntax is as below:
const closestAncestor = Element.closest(selector)
In the example below, we start from the a element and select the div element multiple levels above the a element.
<body>
<div class="fruit_container">
<ul class="fruit_list">
  <li>
    <a href="#">Mango</a>
  </li>
  <li>
    <a href="#">Apples</a>
  </li>
  <li>
      <a href="#">Avocado</a>
   </li>
  <li>
    <a href="#">Pineapple</a>
  </li>
  <li>
    <a href="#">Oranges</a>
  </li>
</ul>
</div>
</body>
const anchor = document.querySelector('a') // select the current element
//find the closest ancestor with the specified selector
const closestAncestor = anchor.closest('.fruit_container')
console.log(closestAncestor) //displays the div element
//<div>...</div>
Traversing sideways
There are two methods of walking the DOM sideways:
nextElementSiblingpreviousElementSibling
Using the nextElementSibling to traverse sideways
You can select the next element using the nextElementSibling
The syntax is as below:
const nextElem = Node.nextElementSibling
Let's select the next item in the list in the example below
<body>
<div class="fruit_cLontainer">
<ul class="fruit_list">
  <li><a href="#">Mango</a></li>
  <li><a href="#">Apples</a></li>
  <li><a href="#">Avocado</a></li>
  <li><a href="#">Pineapple</a></li>
  <li><a href="#">Oranges</a></li>
</ul>
</div>
</body>
const firstListItem = document.querySelector('li')

const nextItem = firstListItem.nextElementSibling
console.log(nextItem)
//<li><a href="#">Apples</a></li>
Using the previousElementSibling
You can select the previous element with previousElementSibling .
In the example below, we first select the second list item (Apples), then select the previous element (Mango)
<body>
<div class="fruit_container">
<ul class="fruit_list">
  <li><a href="#">Mango</a></li>
  <li><a href="#">Apples</a></li>
  <li><a href="#">Avocado</a></li>
  <li><a href="#">Pineapple</a></li>
  <li><a href="#">Oranges</a></li>
</ul>
</div>
</body>
const secondListItem = document.querySelectorAll('li')[1]

const previousItem = secondListItem.previousElementSibling
console.log(previousItem)
//<li><a href="#">Mango</a></li>
Introduction to Events
In the previous sections, you learned how to create and attach elements to the DOM to create the user interface. You also learned how to traverse the DOM.
In this section, you will learn how to interact with these elements to make your web page lively.
Whenever a user or browser interacts with a web page it generates an Event.
Events are signals that something has happened.
Examples of events are:
Submission of a form
Resizing the browser window
Selecting, clicking, or hovering over certain elements, etc.
These events can be categorized into mouse, keyboard, and window events.
Mouse events:
click– when the mouse clicks on an elementcontextmenu– when the mouse right-clicks on an element.mouseover/mouseout– when the mouse cursor comes over / leaves an element.mousedown/mouseup– when the mouse button is pressed/released over an element.mousemove– when the mouse is moved.
Keyboard events:
keydownandkeyup– whenever a keyboard key is pressed and released.
Window events:
onload: fired when the whole page has loadedonunload: when the page has unloaded or the browser window is closedonafterPrintetc
Event handler
To react to the event, you attach an event handler function, that listens for that event happening. Whenever the event occurs, for instance, a form is submitted, the event handler function runs in response to the event happening.
The body of the event handler function contains a block of code detailing the actions to take.
Below are several ways to assign a handler
HTML attribute
DOM Properties
addEventListeners
In this section, we will focus on using the addEventListener method.
Using the addEventListener() method
The addEventListener() is a built-in method that enables you to handle events.
Below is the syntax:
element.addEventListener(event, handler, [options]);
event: represents the event name. Eg. click, scroll, submit, etchandler: represents the handler functionoptions: additional options object with properties
To remove the handler, use the removeEventListener .
The syntax is as below:
element.removeEventListener(event, handler, [options]);
Now, let's target the button element on a web page and listen for a click of the button.
When the event occurs, the handler function will be called in response to the event.
In this example below, the function will log button clicked to the console.
const btn = document.querySelector('button')
// attach an event handler to the button
btn.addEventListerner('click', ()=> {console.log('button clicked')})
Passing events as arguments
Whenever you need additional information on the event, such as the element clicked, or get the value in an input field when a form is submitted, you need to pass the global event object as an argument to the handler function.
The event object contains numerous properties (type, target, currentTarget, etc).
The example below uses event.currentTarget to return the element whose event listener triggered the event
const form  = document.querySelector('form ')
// attach an event listerner to the button
form.addEventListerner('submit', (event)=> {console.log(event.currentTarget)})
In the next section, you will use the knowledge gained to build a "Hey Buddy" app. It is a basic contact list application that displays the full name and phone number of your favorite buddies.
It is recommended that you type all the code snippets in your text editor. This will help build muscle memory and fluency.
Active learning: Building the "Hey Buddy"app
Let's look at the general approach to building the app
The
index.htmlwill contain the basic boilerplate, aulandformtag.All the other required elements will be built using JavaScript. The elements to create are:
input, div , button, li, h1 and p
The form will be nested with two input elements. The first handle the name of the contact, and the next input handles the phone number
We will also attach an event listener to the form, on submission, we will fetch the name and contact values from the inputs and display them in the
ulThe contact details will have a remove button that enables us to remove the contact from the DOM.
Let's get started.
Setting up the Project Directory
Open your favorite editor, and in your project directory, create the following files
index.html,index.js,style.cssLink the
index.jsandstyle.cssto yourindex.htmlfile
In the index.html, copy and paste the code snippet below:
<!-- index.html -->


<body class="body_container">
  <header>
    <h1><span>Hey</span>Buddy</h1>
    <p>Quickly access phone numbers of your go-to buddies, when it matters most.</p>
  <header />

    <main class="main_container">
      <form id="form_container">

      </form>
      <ul>

      </ul>
    </main>

</body>
This
index.htmlfile contains theformandulelements enclosed within themaintag.The file also has a
headerwith the heading BuddyList
Selecting elements from the DOM
Next, in our index.js file, we will select the form and ul tags from the DOM.
Write the following code snippet in your index.js file:
// select the elements from the Document
const form = document.querySelector('form');
const ul = document.querySelector('ul')
Creating the required elements
We want our form to contain div 's , label's , input 's and a button element.
The input elements will accept data from the user.
The first input will accept the full name of your buddy
The second input will accept the phone number.
The label 's provide captions for the inputs whiles the button will help in submission of the form.
Let's create these elements in our index.js file
//index.js

//create label elements
const nameLabel = document.createElement('label')
const contactLabel = document.createElement('label')

//create input elements
const nameInput = document.createElement('input')
const contactInput = document.createElement('input')

//create div elements
const nameDiv = document.createElement('div')
const contactDiv = document.createElement('div')

//create button element.
const btn = document.createElement('button')
Setting attributes on the elements
The setAttribute() method is used to set or add an attribute to a particular element and provides a value to it.
Attributes provide additional information on elements.
We will set the following attributes on our input elements:
type: thetypeattribute specifies the type of input to create. In this tutorial, we will add atextattribute to the name input and anumberattribute to the phone number input.placeholder: The placeholder attribute specifies a short hint that describes the expected value of an input field. We will set the placeholder value for the text input to "Please enter the name of buddy" and that of the phone number to "Enter the phone number of buddy"We will also set a
nameattribute on the inputs. Generally, thenameattribute is used to handle input value after form submission. It can also be used to reference an element in Javascript.Set the value on the
nameattribute on the text input to name, and that of the phone number input to contact
The code snippet for the above instructions is as below, kindly type them in your index.js file.
//set Attributes on elements
nameInput.setAttribute('type','text')
nameInput.setAttribute('placeholder', 'Please enter name of buddy')
nameInput.setAttribute('name', 'name')
//set attributes on the contact
contactInput.setAttribute('type', 'number')
contactInput.setAttribute('placeholder','Enter phone number of buddy')
contactInput.setAttribute('name', 'contact')
Adding content to the elements
Next, we will add text to the label's and button element to instruct the user to click the button to submit the form.
The innerText property in HTML is used to set or return the text content of an element. In this example, we want to set the content of the label and button element.
To achieve that, add the below snippet to the index,js file
//add content to  the labels
nameLabel.innerText = "Full name"
contactLabel.innerText = "Phone number"

//add text to the button
btn.innerText = "Add buddy"
Attaching elements to the DOM
In our previous sections, we created the required elements and set the attributes on these elements. We also added some text to the labels and the button.
In this section, we will attach these elements to the form.
Whenever elements are attached to the parent node in the DOM, the web page will reload to reflect these additions.
Let's attach the created elements to the parent node using the appendChild() method.
First, we want a label for our inputs, we will later attach the label to the div.
To achieve that follow the instructions below:
Select the
nameLabelelement and attach thenameInputSelect the
nameDivand attach thenameLabelSelect the
contactLabeland attach thecontactInputSelect the
contactDivand attach thecontactLabel
nameLabel.appendChild(nameInput)
nameDiv.appendChild(nameLabel)
contactLabel.appendChild(contactInput)
contactDiv.appendChild(contactLabel)
Next, we attach both the nameDiv and contactDiv to the form
//attach div to the form
form.appendChild(nameDiv)
form.appendChild(contactDiv)
Finally, we attach the button to the form
form.appendChild(btn)
The entire code snippet for the above steps is as below
//add text to the button
btn.innerText = "Add buddy"

//attach the created elements to the form
nameLabel.appendChild(nameInput)
nameDiv.appendChild(nameLabel)
contactLabel.appendChild(contactInput)
contactDiv.appendChild(contactLabel)

// attach the div's to the form
form.appendChild(nameDiv)
form.appendChild(contactDiv)
//attach the button to the form
form.appendChild(btn)
Below is the representation in the DOM
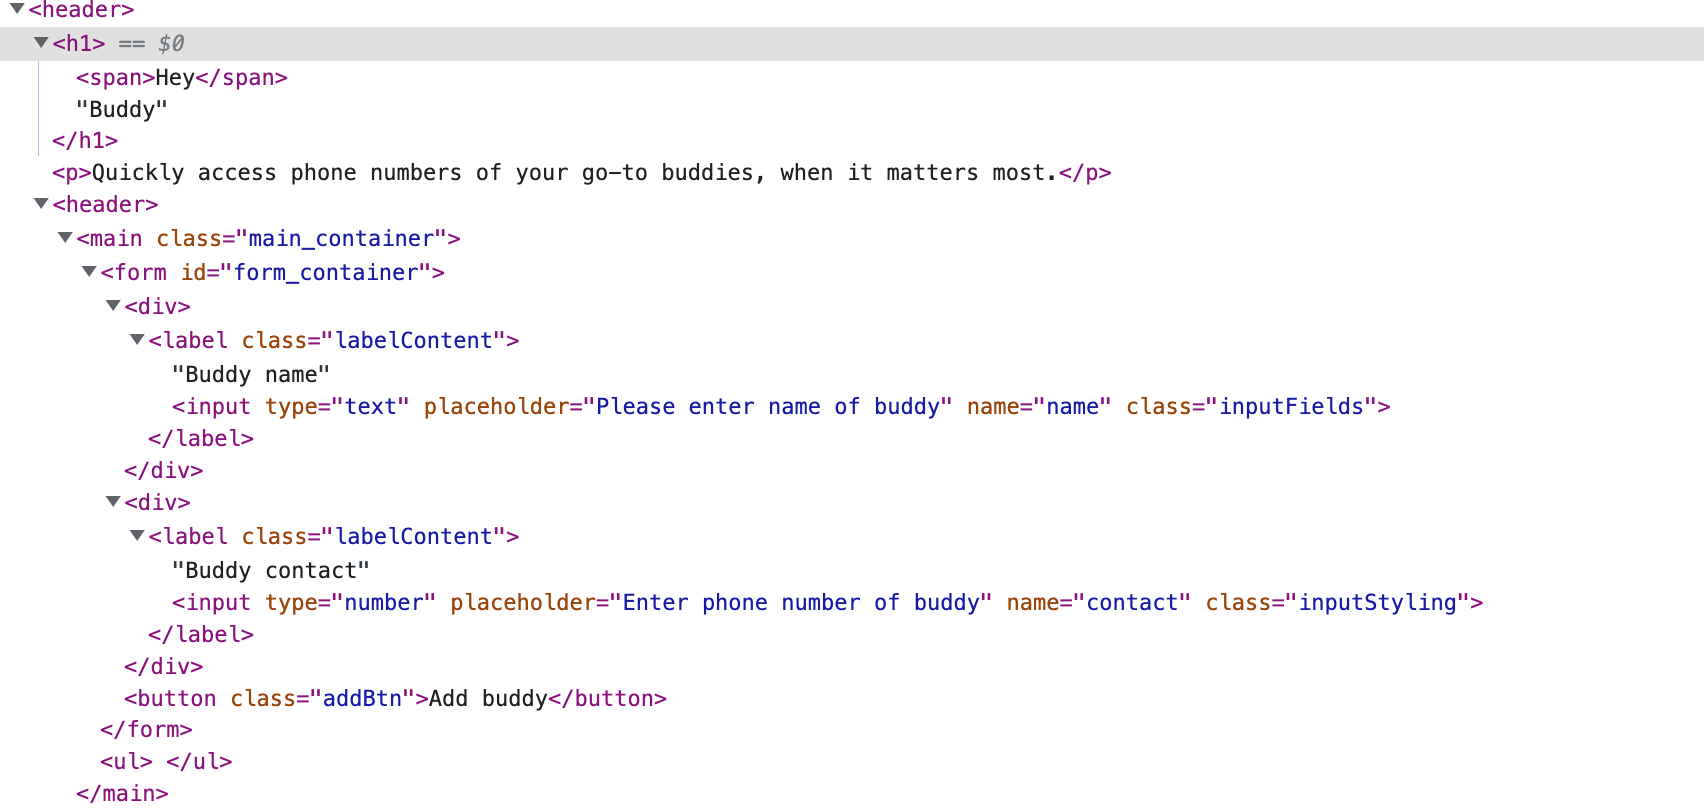
Then on our web page, you will notice the elements have been displayed

Let's focus on the functionality for now, the styling will be dealt with later.
In the next section, we will focus on creating the elements that will help us display the data from the inputs.
Creating the additional user interface
We will declare a createBuddy function, and in the body of the function, we will create the following elements:
li,h2,pandbuttonWe will use the
ultag in theindex.htmltogether with thelito create an unordered listThis list will contain the contact name and phone number represented by the
h2andpelements respectively.The
buttonelement will help remove the contact details from the DOM.
Below we have defined a createBuddy function that enables us to create the elements
// create the elements
const createBuddy = ()=> {
  const buddyItem = document.createElement('li')
  const buddyHeading = document.createElement('h2')
  const buddyPara = document.createElement('p')
  const buddyBtn = document.createElement('button')

}
Add an event handler to the form
Next, we will get the full name, and phone number when the form is submitted, and assign their values to some variables.
We will implement an event handler to handle and verify user inputs and actions. When the button is clicked, we will get the data in the input fields and assign their values to a declared variable.
Let's create an event handler function called, handleFormSubmit
//get the value from inputs on btn click
const handleFormSubmit= (event)=>{
  event.preventDefault()

}
The
handleFormSubmitaccepts aneventparameter.When we call the
handleFormSubmit(), we will pass aneventobject as an argument.The
eventobject will keep track of various events that occur on the page, such as the user submitting the form, and allows you to react to them.The
event.preventDefault()in the body of the function alerts the browser that if there is a default behavior for this event, then skip that default behavior.For example, because we will be submitting a form, the default behavior would be to submit the data to a server. However, due to the
event.preventDefault(), the browser would not submit the form when the button is clicked. This enables us to get the values entered in the input fields and display them on the page.
Let's now attach the handleFormSubmit event handler to the form
We will attach the handleFormSubmit to the form with the help of the addEventListener() method and listen for a submit of the form.
The code snippet is as below:
form.addEventListener('submit', (e)=>handleFormSubmit(e))
Fetching the data from the form
We will use the event.currentTarget method to reference the elements that the event handler has attached.
In our example, the handleFormSubmit has been attached to the two input elements.
We can now get the data entered in the input elements by referring to the name we set on the elements and using the value property to get the entered data.
Below, we get the entered data for the full name and phone number and assign them to the buddyName and buddyContact variables respectively.
const handleFormSubmit= (event)=>{
//prevent default submission of form
  event.preventDefault()
//get the data entered in the input fields
  const buddyName = event.currentTarget.name.value
  const buddyContact = event.currentTarget.contact.value

}
Adding the values in the inputs to the DOM elements
Next, when we submit the form, we want to pass the values stored in the buddyName and buddyContact variables as arguments to the createBuddy function.
This will enable us to add their data as text to the h2 and p elements we have in the createBuddy
The code snippet is as below:
const handleFormSubmit= (event)=>{
//prevent default submission of form
  event.preventDefault()
//get the data entered in the input fields
  const buddyName = event.currentTarget.name.value
  const buddyContact = event.currentTarget.contact.value

// pass data to createBuddy
createBuddy(buddyName,buddyContact)
}
The
createBuddyfunction we will define later will acceptnameandcontactas parameters.In the body of the
createBuddyfunction, we will use thetextContentproperty to assign the values in thenameandcontactto thebuddyHeadingandbuddyParavariables.We will also assign content to the
buddyBtn
The code snippet is as below:
const createBuddy = (name,contact)=> {
 ... //initial code remains the same

//add the content from the inputs to the heading and paragraph
  buddyHeading.textContent = name;
  buddyPara.textContent = contact
 // add content to the button element
  buddyBtn.textContent = "remove buddy"
}
In the next section, we will learn how to attach these elements to the DOM
Attaching elements to the DOM
In the previous section, we created the required elements for the contact details and assign text to them.
In this section, we want to attach elements with their content to the DOM to build our user interface.
Follow the steps below:
Append the
pto theh2Append the
h2to theliAppend the
buttonto theliAppend the
lito theul
Add the code below to the createBuddy function
 //attach the elements to the dom
  buddyHeading.appendChild(buddyPara)
  buddyItem.appendChild(buddyHeading)
  buddyItem.appendChild(buddyBtn)
// append the li to the ul to create the unordered list
  ul.appendChild(buddyItem)
The entire code for this section is as below:
// create buddy
const createBuddy = (name,contact)=> {
  const buddyItem = document.createElement('li')
  const buddyHeading = document.createElement('h2')
  const buddyPara = document.createElement('p')
  const buddyBtn = document.createElement('button')

  //add content to the elements
  buddyHeading.textContent = name;
  buddyPara.textContent = contact
  buddyBtn.textContent = "remove buddy"

  //attach the elements to the dom
  buddyHeading.appendChild(buddyPara)
  buddyItem.appendChild(buddyHeading)
  buddyItem.appendChild(buddyBtn)
  ul.appendChild(buddyItem)

}
Below is the user interface when data has been entered into the inputs and the form has been submitted

The output in the DOM is as below:

Clearing the form fields
We want to clear the values in the input fields whenever the form has submitted.
- We will use declare a
clearFormfunction in the JavaScript file, and use thereset()method on theformto clear all the values in the input fields.
The code is as below:
//clear form field when submitted
const clearForm = ()=>{
  form.reset()
}
- We will execute the
clearFormfunction in the body of thehandleFormSubmitso that whenever the form is submitted, we clear the inputs.
The code is as below:
const handleFormSubmit= (event)=>{
  ... // previous code remains the same

  //clear field values
  clearForm()

}
Removing the contact from the DOM
Finally, we can choose to delete any of our favorite buddy from the contact list. This action will remove the item from the DOM as well
To achieve that, we use the
removeChild()method.This method removes a child node from the parent node.
In this tutorial, the ul is a parent node and a li child node.
Because the contact details are in the li, we will attach an event handler to the "remove buddy" button.
Whenever the button is clicked, we will remove the li from the ul in effect removing the contact details.
The code snippet is as below:
//remove buddy on button click
const removeBuddy = (item, btn )=> {
  btn.addEventListener('click',()=>{ ul.removeChild(item)})
}
Let's call the removeBuddy inside the createBuddy function, so that we can pass the buddyItem and buddyButton as arguments to the removeBuddy
// create buddy
const createBuddy = (name,contact)=> {
... // previous code remains the same
 //pass item and button as arguments
  removeBuddy(buddyItem, buddyBtn)
}
The entire code for all the above steps is as below:
// select the elements from the Document
const form = document.querySelector('form');
const ul = document.querySelector('ul')

//create label elements
const nameLabel = document.createElement('label')
const contactLabel = document.createElement('label')

//create input elements
const nameInput = document.createElement('input')
const contactInput = document.createElement('input')

//create div elements
const nameDiv = document.createElement('div')
const contactDiv = document.createElement('div')

//create button element.
const btn = document.createElement('button')


//set Attributes on elements
nameInput.setAttribute('type','text')
nameInput.setAttribute('placeholder', 'Please enter name of buddy')
nameInput.setAttribute('name', 'name')

//set attributes on the contact
contactInput.setAttribute('type', 'number')
contactInput.setAttribute('placeholder','Enter phone number of buddy')
contactInput.setAttribute('name', 'contact')

//add content to  the labels
nameLabel.innerText = "Buddy name"
contactLabel.innerText = "Buddy contact"


//add text to the button
btn.innerText = "Add buddy"


//attach the created elements to the form
nameLabel.appendChild(nameInput)
nameDiv.appendChild(nameLabel)

contactLabel.appendChild(contactInput)
contactDiv.appendChild(contactLabel)

form.appendChild(nameDiv)
form.appendChild(contactDiv)
form.appendChild(btn)

// create buddy elements
const createBuddy = (name,contact)=> {
  const buddyItem = document.createElement('li')
  const buddyHeading = document.createElement('h2')
  const buddyPara = document.createElement('p')
  const buddyBtn = document.createElement('button')

  //add content to the elements
  buddyHeading.textContent = name;
  buddyPara.textContent = contact
  buddyBtn.textContent = "remove buddy"

  //add class to the button
  buddyBtn.setAttribute('class', 'removeBtn')
  //attach the elements to the dom
  buddyHeading.appendChild(buddyPara)
  buddyItem.appendChild(buddyHeading)
  buddyItem.appendChild(buddyBtn)
  ul.appendChild(buddyItem)

  //remove item from list on button click
  removeBuddy(buddyItem, buddyBtn)
}


//clear form field when submitted
const clearForm = ()=>{
  form.reset()
}

//get the value from inputs on btn click
const handleFormSubmit= (event)=>{
  event.preventDefault()
  const buddyName = event.currentTarget.name.value
  const buddyContact = event.currentTarget.contact.value
 // call create items
  createBuddy(buddyName,buddyContact)
  //clear field values
  clearForm()

}
//submit the form
form.addEventListener('submit', (e)=>handleFormSubmit(e))


//remove buddy on button click
const removeBuddy = (item, btn )=> {
  btn.addEventListener('click',()=>{ ul.removeChild(item)})
}
Styling our app
Let's now focus on styling our web app.
In the style.css we have declared all the required selectors and their corresponding CSS properties.
 @import url('https://fonts.googleapis.com/css2?family=Poppins:wght@300;400;500;600&display=swap');

* {
  box-sizing: border-box;
  margin: 0;
  padding:0;
  font-family: 'Poppins', sans-serif;
}
header {
  display:grid;
  place-items:center;
  color: #361D2E;
  margin-top:2rem;

}
header > h1 {
  padding: 1rem;
  font-size: 3rem;
  font-weight: 600;
}
header > h1 > span {
  font-weight: 100;
}
header > p {
  font-size: 1.2rem;
  margin-bottom: 2rem;
}
.body_container {
  background-color: #F2F4CB
}
.main_container {
  width: 50vw;
  border: 5px solid #593D3B;
  border-radius: 1rem;
   padding:2rem;
}
ul {
  list-style-type:none;
  display:flex;
  flex-wrap: wrap;
  gap: 3.5rem;
  margin-top:2rem;
}
ul > li {
 background-color: #361D2E;
 padding-left: 1rem;
 padding-right: 1rem;
 border-radius: 20px;
 color: #fff;
 flex-basis: 45%

}
ul > li > h2 {
 font-size: 1.3rem;
 text-transform: Capitalize;
 padding: 1rem 0rem;
 font-weight: 600


}
ul > li > h2 > p {
  margin-top: 1rem;
  font-weight: 100;
  color:  #F2F4CB;
}
input {
  width: 70%;
  font-size: 1.1rem;
  border:none;
  padding: 0.5rem;
  margin: 1rem;
  border-radius:10px;
}
input[type="text"] {
  margin-left: 2.2rem;
}

.labelContent {
  font-size: 1.3rem;
}
button {
  font-size: 1.2rem;
  border:none;
  outline:none;

}
.addBtn {
   background-color: #593D3B;
  color: #fff;
  margin: 1rem 0rem;
  padding:1rem;
  border-top-left-radius: 20px;
  border-bottom-right-radius: 20px;
}
.addBtn:hover, .addBtn:active {
  background-color: #8A7968;
  cursor: pointer;
  transition: all 0.5s ease-in;
}
.removeBtn{
  background-color: #8A7968;
  margin: 1.5rem 0rem;
  color: #fff;
  padding:0.5rem;
  width: 100%;
  border-radius: 10px;
}
.removeBtn:hover, .removeBtn:active {
  cursor: pointer;
  background-color: #fff;
  color: #361D2E;
  transition: all 0.5s ease-in
}
A quick look at what has been implemented
We imported the Poppins font from Google
We defined what the background color of the app will be in the
body-containerclassWe have declared the style for the
inputelements, buttons, labels, li's etc.
Now, we want to dynamically style our app using JavaScript.
- Firstly, select the
bodyelement and apply thebody_containerclass to it using thesetAttributeproperty
const body = document.querySelector('body')

body.setAttribute('class','body_container')
- Next, select the input elements, and using the
setAttributeand apply the requiredclassto it.
nameInput.setAttribute('class','inputFields')
contactInput.setAttribute('class', 'inputStyling')
- Select the label elements, and apply the required
classto it
//label
nameLabel.setAttribute('class', 'labelContent')
contactLabel.setAttribute('class','labelContent')
- Finally, select the button element, and style it
btn.setAttribute('class','addBtn')
Below is the output of the web app after applying the styling

The source code to the tutorial is as below
Summary
In this article, we learn that
The Document Object Model (DOM) is a tree-like representation of the content of the web page
It is the DOM that gives JavaScript the superpower to access and manipulate the structure, content, and appearance of a web page.
You can access the DOM elements using the ID, class, tag, and selectors.
Use the
document.createElement()method to create an HTML elementAdd elements to the DOM using
parentNode.appendChild(childNode)You can style HTML elements with the
setAttribute()method.
If you have found value in this article, or what to provide some feedback, please do leave your comment. I am looking forward to reading your messages. Don't forget to also share this article on your social media handles, to reach more audience.
Till then, keep learning, and keep growing!


