Introduction
In our previous post, we learned about Express and some basic features of an Express app.
In this post, we will set up a Node/Express development environment to enable us to start developing Express apps.
Overview of an Express development environment
A development environment is a workspace with a set of processes and programming tools used to develop the source code for an application. It enables developers to create and innovate without breaking something in a production environment.
The Express development environment we will set up will contain an installation of Node and the node package manager(npm) on your computer. Express will then be installed by npm as a dependency of your express application.
A typical development environment also includes installing tools like a text editor (e.g Visual studio code) and a source control management system (e.g Git)
Installing Node
To use Express, you would first have to install NodeJS and the node package manager (npm). The easiest approach to install Node is to download the installer from the official NodeJs website. The installer includes the node package manager.
On completion of the download, double-click the installer to initiate the process, and follow the recommended steps to finish the installation on your computer.
Testing the Node installation
To test if Node and npm were successfully installed on your computer, open your command prompt, Git bash terminal, or VS Code editor terminal and run the commands below:
node -v
npm -v
If the installation was successful, running these commands one after the other will display the current node version and npm version respectively. See the screenshot below

Initializing the package.json file
Create a package.json file for your application using the command:
npm init
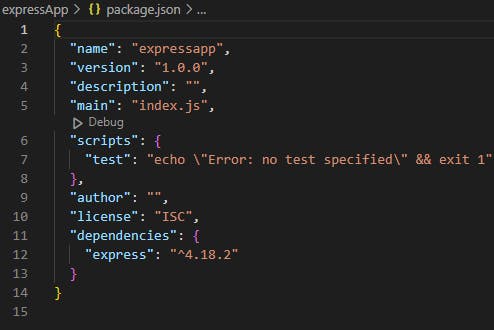
The package.json file resides in the root directory of your project. It holds vital information about the project and contains details like:
Project name, version, and description
Name of the initial entry point
- By default, it is set as
index.js, there is no need to change anything. You can enter a different file name (eg.app.js) , and that becomes the name of your main file
- By default, it is set as
It also contains a list of tools your project depends on (dependencies)
Click on the Enter key to run the command and click on the Enter key again to accept the defaults for most of them.
Installing Express
Install Express in your working directory, it will be saved in the dependencies list of the package.json file
The command to install Express is below
npm install express

Express will now be included in the dependencies section of your package.json file.

Installing Nodemon
We will install another package called nodemon.Nodemon is a tool that enables develop Node.js based applications by automatically restarting the app (server) when file changes in the directory are detected.
It will be installed as a development dependency (dev dependency) meaning, it will exclude the package when the app is pushed to production.
Run the command below to install nodemon
npm i -D nodemon
Summary
In this post, we set up a Node development environment on our computer. We also learned how to use npm to include Express in our application.
In the next post, we will learn how to use the Express library in our project, and get our app running
This article is the day 4 post on the 30-day challenge I am undertaking to learn backend development. Please feel free, to drop some insights, comment, or share the post to your networks
