In this article, you will learn how to use Typescript in your React applications to write better, more type-safe code. Typescript adds rules on how different kinds of values can be used. This helps developers catch and fix type-related errors as they write their code in the editor.
At the end of the article you will know:
What Typescript is and why it is important
Understand the everyday types you will use in your app
How to type
propsin a componentHow to type
events handlersHow to type values in
useState,useRefanduseContexthooks
Prerequisite:
Basic understanding of React
Familiarity with TypeScript everyday types
Introduction to TypeScript: a static type checker
Developers encounter a lot of type errors when building apps. This means some value was used where we would expect a specific kind of value. For example, you accessed a property on an object that was not present.
Here is an example:
const userDetails = {name:"Emmanuel", location:"Ghana"}
//loction property does not exist on the userDetails
console.log(userDetails.loction) //check the spelling of loction
The objective of Typescript is to be a static type checker for JavaScript programs. Static type checking is how to determine what is an error and what's not based on the kind of value being operated on. Typescript is a tool that runs before your code runs to ensure the correct types of values.
Using Typescript developers can check for errors when programming before running the app. It achieves this by checking the type of values assigned to variables, function parameters, or values returned by a function. If the value assigned to the variable does not match the data type defined for that variable, Typescript catches that as an error and allows you to fix it.
This improves the development experience as it catches errors as you type the code rather than checking the browser or console to detect the error.
Why add Typescript to JavaScript
JavaScript is a dynamic type(loosely typed) language. This means you do not specify the type stored in a variable in advance. With dynamic typed language, variables can change their type during runtime. A variable can be assigned a string and later assigned an object. This means type errors may only be discovered at run time.
To avoid this experience, Typescript has been added as a layer on top of the JavaScript language. This introduces static typing to JavaScript. In static typing, you explicitly define data types of the values, function parameters, and return values while writing the program and cannot change during runtime.
A Typescript compiler in your project enforces type correctness by checking the types of variables and expressions before the app is executed. If an error is detected, the app will not be compiled until the errors are fixed. As a result, Typescript catches type-related errors during development, improving code quality.
In the next section, we will look at the type annotation and common types in Typescript.
Understanding type annotation
You can add a type annotation to explicitly specify the type of the variable, functions, objects, etc.
Type annotations are specified by adding a colon (:) followed by the specified type after the identifier.
For example, in the context of variables and constants, the syntax for type annotations is as follows:
let variableName: type;
let variableName: type = value;
const constantName: type = value;
Here is an example of how to annotate and assign primitive data types ( string, number , boolean) to variables.
let userName: string = "Emmanuel" //assigns a string value to userName
let age: number = 23 // assigns a number value to age
let isLoggedIn: boolean = true // assigns a boolean value to isLoggedIn
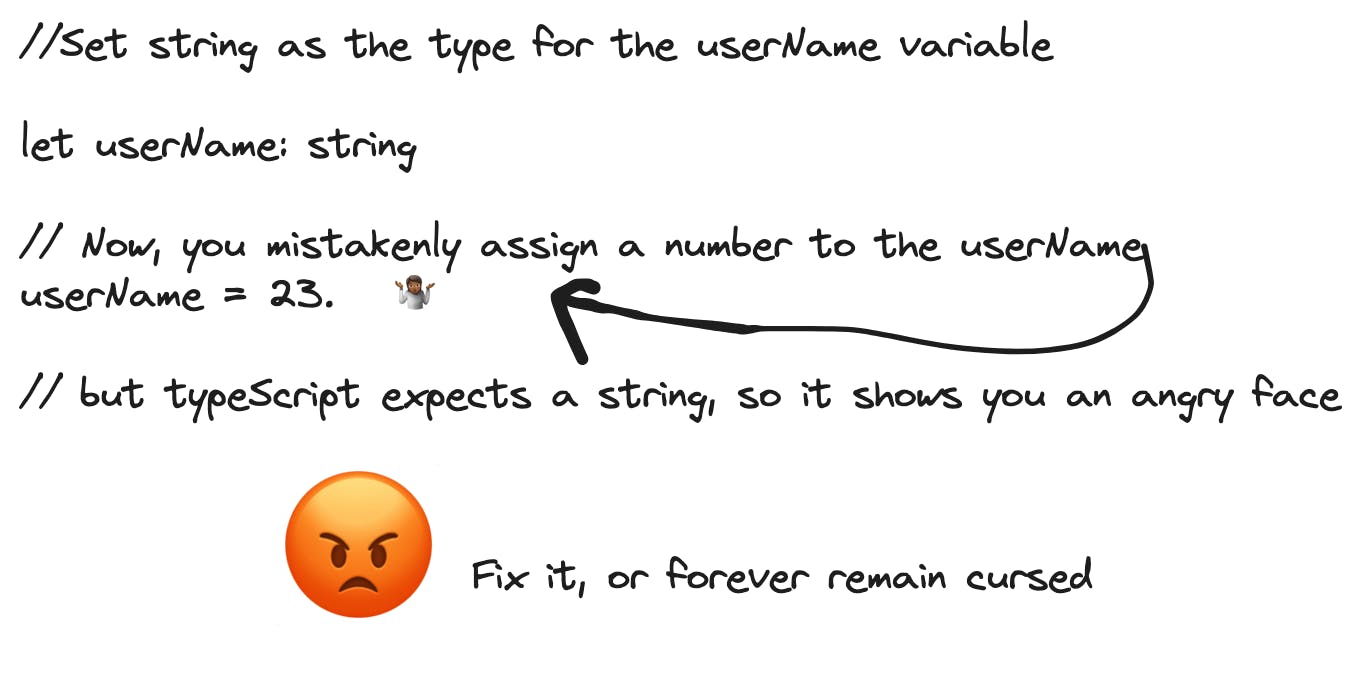
Once a variable is annotated with a type, it can be used as that type only. If the variable is used as a different type, TypeScript will issue an error.
For instance, you can only assign a string value to the userName. If you try assigning a number, it will throw an error.
See the example below:
userName = 23
//error logged
Type 'number' is not assignable to type 'string'.
Basic Types
In this section, we will revisit some basic types to help you understand the TypeScript type system. Here are some basic types:
Array: To annotate a array type you use the specific type followed by a square bracket.
Here is the syntax:
let arrayName: type[];
For instance, the code below specifies an array of strings
let persons: string[] = ["Emmanuel", "Robert", "Thomas"]
Object: To specify a type for an object, you use the object type annotation. Here is an example:
//annotate the type for each property in the object
let userDetails: {
    name: string,
    age: number,
    location: string,
    isLoggedIn: boolean
}
// assign the expected values to each property
userDetails = {
    name:"Robert",
    age: 23,
    location: "Ghana",
    isLoggedIn: true
}
In the example above, the properties of theuserDetails has been annotated with the preferred type:
nameof typestringageof typenumberlocationof typestringisLoggedInof typeboolean
Functions: Functions are the primary way of passing data in JavaScript. Typescript allows you to specify the types for both the parameters and the return values.
On declaring a function, you can add type annotation after each parameter.
The example below shows a function with type annotation for the name parameter:
// Parameter type annotation
function greetUser(name: string) {
  console.log(`Hellos ${name});
}
Now that the name has a string type, any argument passed to the function will be checked. If it does not match the expected type, Typescript catches it and throws an error.
Here is an example:
//when executed, it will generate a runtime error
greetUser(34)
//error log
Argument of type 'number' is not assignable to parameter of type 'string'.
Return Type annotation: Return type annotations appear after the parameter list to indicate the type of the returned value.
Here is an example:
// the function would return a number
function getNumber(): number {
  return 26;
}
If a function does not return any value, the return type is void
function greetUser(): void {
console.log("Hi there")
}
Function parameter types
If object is passed as a parameter to a function, you will use the object type annotation. To annotate an object type, you annotate the type for each property.
Here is an example:
function showUserDetails(user:{firstName: string, age: number}){
 console.log(`Hello ${user.firstName}, you are ${user.age} years`)
}
showUserDetails({firstName:"Emmanuel", age:23})
Optional Properties
You can specify that a property in an object is optional. To do this, add a ? after the property name.
Using the previous example, you can set the lastName property as optional.
Here is an updated version:
//parameter with optional lastName
function showUserDetails(user:{firstName: string, lastName?:string, age: number}){
 console.log(`Hello ${user.firstName}, you are ${user.age} years`)
}
showUserDetails({firstName:"Emmanuel", age:23}) // lastName is optional
showUserDetails({firstName:"Rober", lastName:"King",age: 24}) //lastName is included
Union Types
Union Types allows developers to build new types by combining different types.
Below is the syntax
let variableName: type | anotherType
For instance:
let userId: string | number
//userId can be assigned either a string or number type
userId = 2
userId = "2"
In the example below, we have declared a function that can accept either a string or number type as a parameter
//type can be a number or string
function getUserId(id:number | string){
  console.log(`The user ID is ${id}`)

}
getUserId(9) // works when a number is passed
getUserId("23") // works when a string is passed
Type aliases
Type aliases allow developers to use the same type more than once and refer to it by a single name.
The syntax for a type alias is:
type alias = existingType
The existingType can be any valid type.
Here are some examples:
type chars = string
let message: chars //same as assigning a string type
//object type now has an alias UserType
type UserType = {
  firstName: string,
  lastName?: string,
  age: number
}

function showUserDetails(user:UserType){
 console.log(`Hello ${user.firstName}, you are ${user.age} years`)
Interfaces
Interfaces are similar to type aliases. However, they only apply to object types.
Here is an example of an interface
//declare the interface
interface UserInter {
  firstName:string,
  lastName?: string,
  age: number
}
function showUserDetails(user:UserInter){
 console.log(`Hello ${user.firstName}, you are ${user.age} years`)
We have covered all the common types used in TypeScript. In the next section, we will know how to add TypeScript to a React app.
Setting up Typescript in a React project
To start a React app project with TypeScript, you can run:
npx create-react-app my-app --template typescript
This will add TypeScript to your React app. Replace "my-app" with the name of your app. Notice that all the familiar .jsx extensions will be replaced by .tsx. Also, any component you create should end in the .tsx . For instance MyComponent.tsx
Here is the GitHub for the tutorial. For easy reference, the concepts to learn are in a separate branch
First, let's learn how to type React Components
Typing React Function Component
Use React.FC to explicitly specify the type of a React Function component including its props. This provides type-checking and autocomplete for static properties. When you define a component using React.FC, you can specify the type of the component's props within angle brackets.
Below is the syntax
React.FC<MyProps>
Here are some examples of typing function components
import React from "react";

const MyComponent: React.FC = () => {
  return <div>MyComponent</div>;
};

export default MyComponent;
Typing component props
Components accept props. props have values hence, you can type props. With this approach, TypeScript will provide type checking and validation for props passed to the component. When you call the component and assign a value of the wrong type to the prop, TypeScript will throw an error.
There are four approaches to typing props:
Using React.FC
Define types inline
Use a type alias
Use an interface
Inline typing with destructuring
Here is an example of using React.FC to type props
import React from "react";

//Example of typing React Component props
const MyComponent: React.FC<{ hasLoggedIn: boolean }> = ({ hasLoggedIn }) => {
  return <div>{hasLoggedIn && "Welcome to learn TypeScript"}</div>;
};

export default MyComponent;
In the example above we:
MyComponentis of typeReact.FCExplicitly type the props using angle brackets:
React.FC<{ hasLoggedIn: boolean }>The
hasLoggedInprop is of typeboolean
Here is another example of using React.FC to type props:
//Greetings2 accepts firstName and lastName props
const Greetings2: React.FC<{ firstName: string; lastName: string }> = ({
  firstName,
  lastName,
}) => {
  return (
    <div>
      Hello {firstName} {lastName}
    </div>
  );
};
You can also type the props within the parameter (inline typing of props)
Here is an example of inline typing of props:
export const MyComponent2 = ({ hasLoggedIn }: { hasLoggedIn: boolean }) => {
  return (
    <div>
      {hasLoggedIn && "Welcome to learn inline typing of props TypeScript"}
    </div>
  );
};
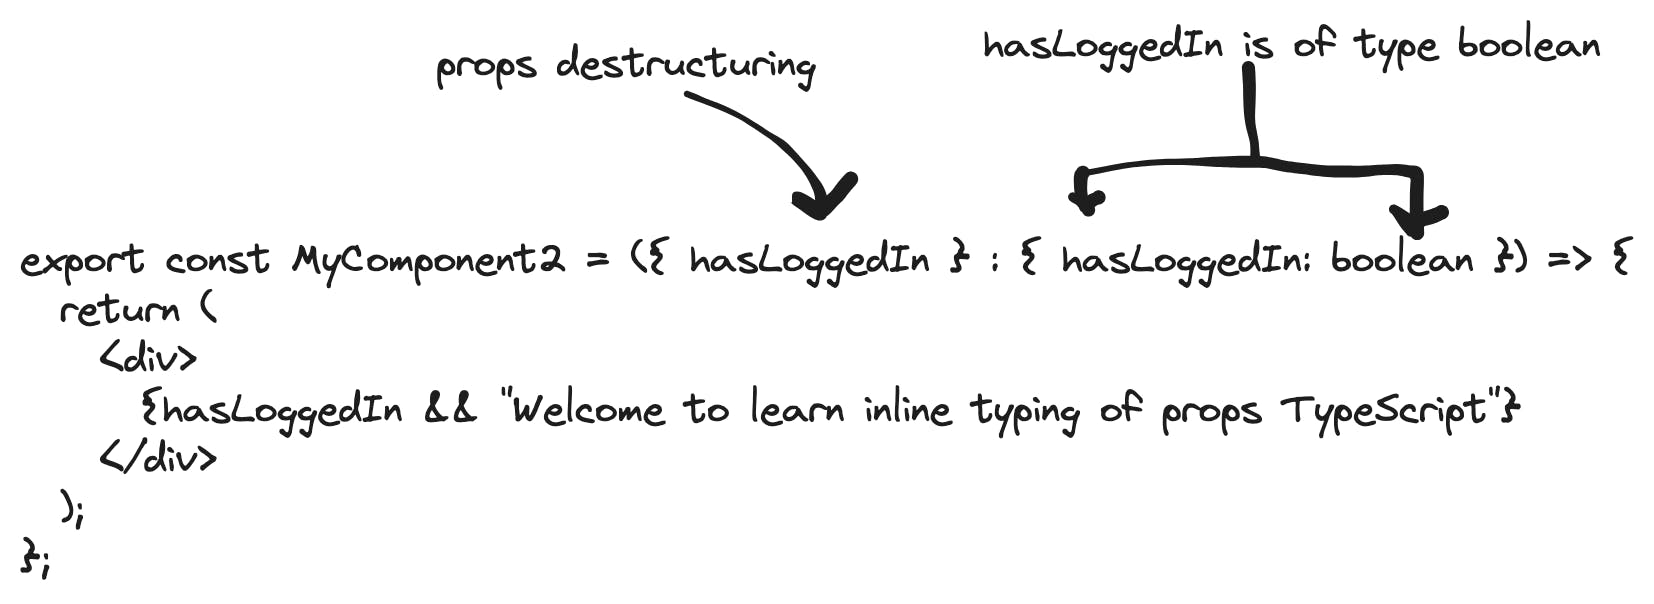
In the example above we:
Destructure the
hasLoggedInpropsAnnotate the type of the
hasLoggedInasboolean
If the component accepts more than one prop, you can perform inline destructuring of the props and type each prop.
Here is an example:
export const MyComponent3 = ({
  firstName,
  age,
}: {
  firstName: string;
  age: number;
}) => {
  return (
    <div>
      Hello {firstName} you have {age} years of development experience
    </div>
  );
};
When the MyComponent3 is called and we assign the value "Emmanuel" to the firstName prop only, TypeScript will underline the component with a red squiggly line to indicate there is an error. On hovering, it indicates what the errors are
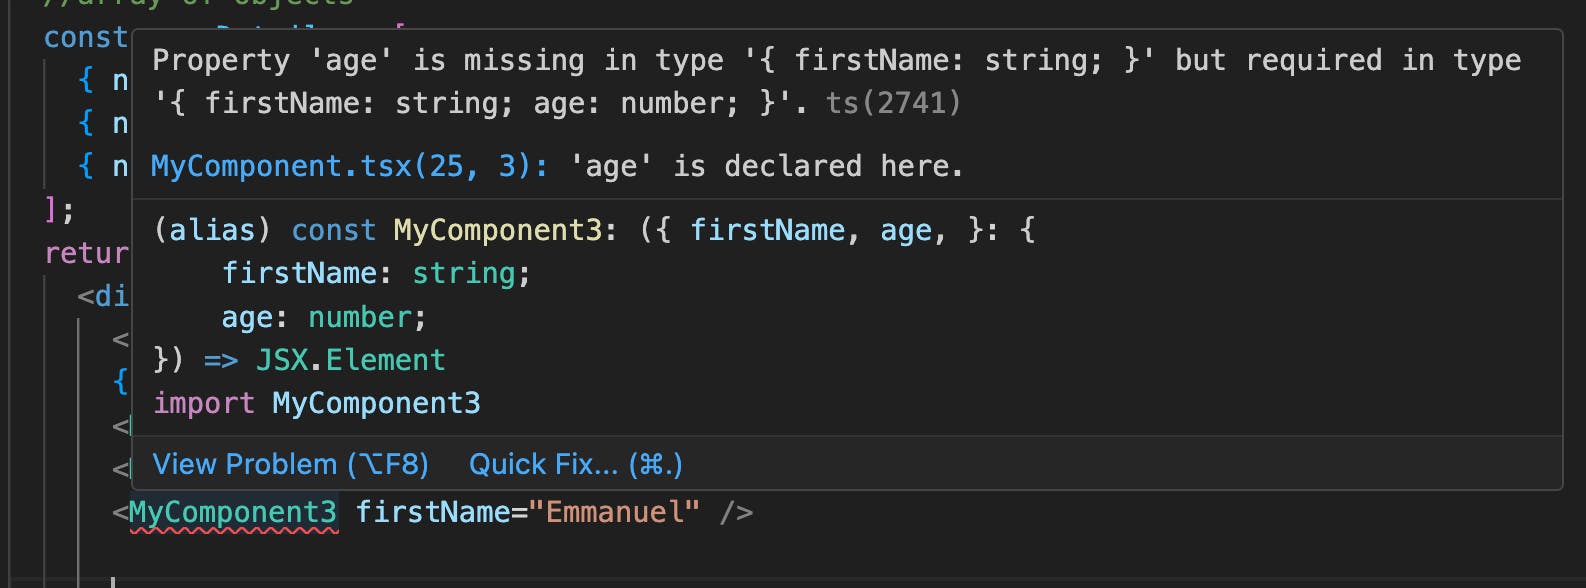
In this example:
TypeScript performs a type-checking and realizes the
ageprop has not been passed toMyComponent3Such errors would have been unnoticed in React when writing the code and only show when the app runs but with TypeScript functionality added, we can quickly spot and fix the error.
To fix it, we pass the
ageprop to theMyComponent3.
Here is the fixed component
<MyComponent3 firstName="Emmanuel" age={3} />
Using type alias with inline typing
Instead of using inline prop type: ({firstName, lastName}: { firstName: string; lastName: string }) , you can use a type alias which is another name you are giving to the defined type, and replace the inline type with the alias.
Let's call the type alias Greetings
//type alias Greetings is an object with typed properties
type Greetings = {
  firstName: string;
  lastName: string;
};
Now, replace the inline typing with Greetings
//using type aliase
const Greetings = ({ firstName, lastName }: Greetings) => {
  return (
    <div>
      <p>
        Welcome {firstName}
        {lastName}
      </p>
    </div>
  );
};
Using Type alias with React.FC
Here's an example of using a type alias with React.FC in TypeScript
//The props is of type TGreetings
type TGreetings = {
  firstName: string;
  lastName: string;
};
//Type the props using React.FC
const Greetings3: React.FC<TGreetings> = ({ firstName, lastName }) => {
  return (
    <div>
      Hello {firstName}
      {lastName}
    </div>
  );
};
Typing component that accepts an array of object
When typing a component that accepts an array of objects in TypeScript, you can use a type alias to define the structure of the objects within the array
Here is an example of how to achieve that:
import React from "react";
//define the structure of the objects within the array
type UserType = {
  name: string;
  age: number;
  hasPaid: boolean;
};

//UserType[] has an alias UserTypeArray
type UserTypeArray = UserType[];
//use the type alias for the data props within React.FC
const Users: React.FC<{ data: UserTypeArray }> = ({ data }) => {
  return <div>{/* Something goes here */}</div>;
};

export default Users;
In the above we:
Renamed the type for each property in the object with an alias
UserType.Because we expect an array of objects we use the syntax
{}[]. HenceUserType[]represents a type alias composed of an array of objectsRenamed the
UserType[]with type aliasUserTypeArrayType
Userscomponent withReact.FC.Finally, we type the
dataprops with aliasUserTypeArray
Now, we can mount the User component and pass it the required values. TypeScript will compile and validate that the type of each property matches the expected type
import React from "react";
import Users from "./components/TypingProps/Users";

function App() {
  const userDetails = [
    { name: "Roberty Hagan", age: 23, hasPaid: true },
    { name: "Timothy Tans", age: 12, hasPaid: false },
    { name: "Cynthia Robets", age: 34, hasPaid: true },
  ];
  return (
    <div>
      <h3>React TypeScript Tutorial</h3>

      <Users data={userDetails} />
    </div>
  );
}

export default App;
Using components as props
Generally, to pass components as props, you wrap the Child component around the Parent component. Here is an example:
<Parent>
  <Child />
 </Parent>
In such situations use React.ReactNode to type the children prop in the Parent component
Let's see an example
import React from "react";

const Parent = ({ children }: { children: React.ReactNode }) => {
  return (
    <div>
      This is the Parent component
      {children}
    </div>
  );
};

export default Parent;
In the code above:
The
Parentcomponent accepts thechildrenprops.The
childrenprops is of typeReact.ReactNodeThis indicates to TypeScript the parent component will accept another component as a prop.
Typing events
React events are triggered by actions such as clicks, changes in input elements, etc. TypeScript allows you to type different event passed as parameters to event handler functions.
Here are some examples:
React.MouseEvent<HTMLButtonElement>: This represents the type of event object that is created when a button is clicked.React.ChangeEvent<HTMLInputElement>: This represents the type of event object created when the value of an input element is changed.
Let's see an example of typing an onClick event:
import React from "react";

const UserInput = () => {
  const handleClick = (e) => {
    console.log("button clicked");
  };
  return (
    <div>
      <form>
        <input type="text" name="" id="" placeholder="Enter name" />
        <button onClick={handleClick}>Submit </button>
      </form>
    </div>
  );
};

export default UserInput;
In the example above, we have a handleClick event handler that accepts an e prop. Because we have not typed the e parameter, TypeScript annotates the type with any , and compiles with an error.
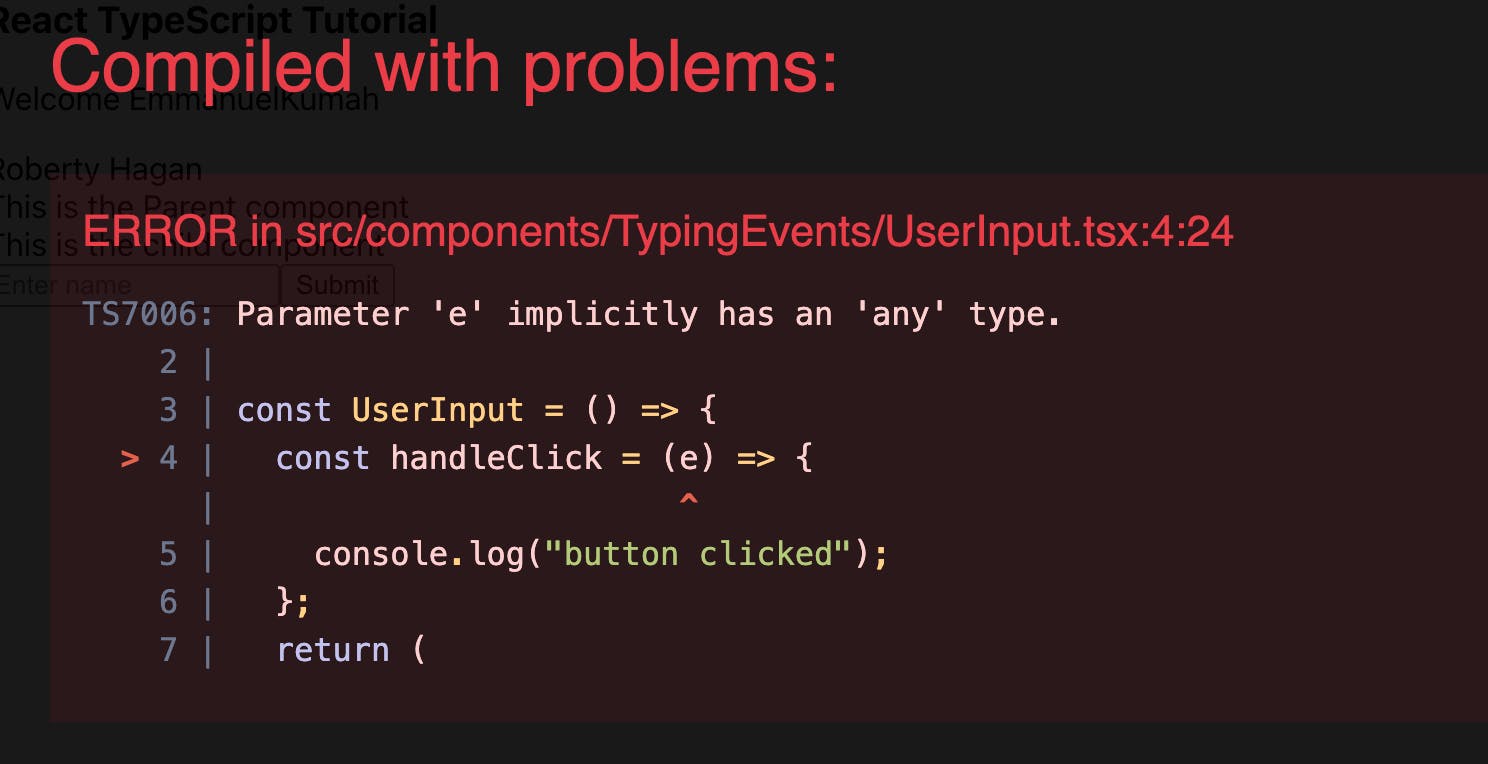
To fix this in TypeScript, when you define an event handler for a button click, the event parameter is of type React.MouseEvent<HTMLButtonElement>. This ensures type safety and provides access to properties specific to the mouse event linked to the button click.
import React from "react";

const UserInput = () => {
//add type to mouse event
  const handleClick = (e: React.MouseEvent<HTMLButtonElement>) => {
    console.log("button clicked");
  };
  ...
};

export default UserInput;
TypingonChange event
When the input elements such as text fields, checkboxes, radio buttons, etc accept an onChange event, in the event handler, the type of the event will be React.ChangeEvent<HTMLInputElement>
Below is an example:
//typing the event parameter in an onChange event handler
  const handleInputChange = (e: React.ChangeEvent<HTMLInputElement>) => {
    console.log(e.target.value);
  };
...
  <input
          type="text"
          name=""
          id=""
          placeholder="Enter name"
          onChange={handleInputChange}
   />
...
In summary, When you want to type a native event handler, just hover over on the event: onClick, onChange etc to find the event type to use.
Here is an example using the onClick event
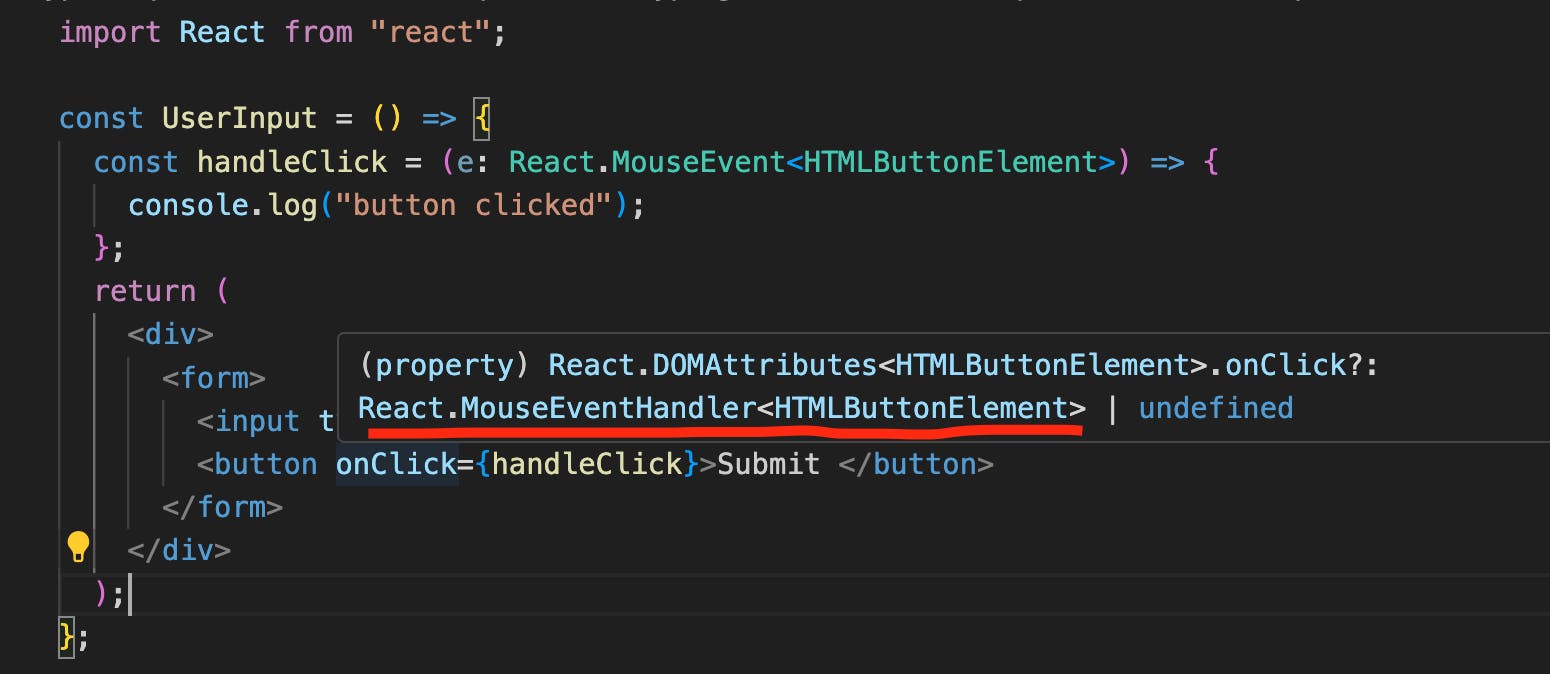
In the next section, you will learn how to type useState hooks.
Typing useState hook
When using the useState hook in a TypeScript component, there are ways to type the state and the setState function to ensure type safety
Here are some approaches:
Inferring type
Providing type
Custom type
Explicitly setting types for complex objects
Type signature of useState
Let's see some examples:
- Inferring type: Typescript can infer type based on the initial value
const [value, setValue] = useState(""); //string type inferred
const [value, setValue] = useState(0); // number type inferrred
Providing type: Use TypeScript Generics to explicitly provide the type
  const [value, setValue] = useState<string>("Hello World");
   // Typed the initial value as a string
  const [value, setValue] = useState<string|null>(null);
  // Typed initial value as string or null using union type
Custom type: When dealing with values like objects or arrays, TypeScript generics can be used to specify the custom type.
Here is an example:
  export const Example2 = () => {
  //define a type alias for the object
    type TUser = {
      name: string;
      age: number;
      hasRegistered: boolean;
    };
  //user is of type TUser
    const [user, setUser] = useState<TUser>({
      name: "Emmanuel",
      age: 23,
      hasRegistered: true,
    });
    return (
      <div>
        <h2>Example of custom type with object </h2>
        <p>
          Hello {user.name}, you are {user.age} years old and
          {user.hasRegistered && "has registered"}
        </p>
      </div>
    );
  };
In the code above, we :
type each property in the object, and renamed the object type as
TUserusing type aliasSpecified the
userstate to be of typeTUser
InitializinguseStatewith empty array
When the useState hook is initialized with an empty array [], TypeScript will infer the type of state variable as never array. This means the state variable will never contain any elements. Therefore, if you attempt to update the state to an array of object , it will result in an error.
Below is the screenshot of useState initialized with an empty array []. When you hover over the useState in your code editor, the type is <never[]>

Now, on button click, we call the
handleUserevent listener and thesetUsersupdates theusersstate to an array ofobjects.In the
jsx, wemapover each item in the state and return theuserName

This code will work fine in a general React app, but with TypeScript support added, you will notice errors in the editor. Because the useState hook uses type inference to initialize the users state to the type never[]. Later the setUsers method tries to update it to an array of object. TypeScript is not happy so it compiles with errors.
To fix this, we need to initialize the users state with a type.
Here is how to achieve that:
Just after the
useState, define a generic type<>Between the
<and>, specify the type for the state. In this example, the type is an array of objects.{}[]Specify the type for each property in the object
{id:number, userName:string}[]
The code is as below:
//adding type to the useState hook.
  const [users, setUsers] = useState<{ id: number; name: string, age:number }[]>([]);
You can give the object an alias and use the alias instead. Here is an example:
//type alias
type TUser = {
    id: number;
    name: string;
    age: number;
  };
  const [users, setUsers] = useState<TUser[]>([]);
Typing useContext hook
To type the useContext with TypeScript, you will create a context object and specify the type of the context value using the generic type parameter. Now, when you consume the context with useContext, TypeScript will infer the type based on the content object.
Here is an example:
import { createContext } from "react";

//define a type alias for the object type
type Theme = {
  color: string;
  background: string;
};

export const ThemeContext = createContext<Theme>({
  color: "black",
  background: "red",
});
In the example above :
- The
ThemeContextis created with a generic type parameterTheme. This specifies the type of the context value
Next, in your component, call the useContext hook. When you use the hook, TypeScript infers the type of the context value based on the type provided when creating the context
Here is an example
import React, { useContext } from "react";
import { ThemeContext } from "./ThemeContext";

const ThemeComponent = () => {
  const theme = useContext(ThemeContext);
  return (
    <div style={{ color: theme.color, background: theme.background }}>
      <h3>Theme Component</h3>
    </div>
  );
};

export default ThemeComponent;
In the example above we:
Call the
useContexthook.Read the value from the
ThemeContext
If you don't have any default value when you create the context, you can specify null and set the type of value the createContext will have.
Here is an example:
import { createContext } from "react";

//define type alias
type Theme = {
  color: string;
  background: string;
};
//default value is set to null
export const ThemeContext = createContext<Theme | null>(null);
This means the type of the ThemeContext value can be null or Theme.
Now that the type context can be
null, you'll get a TypeScript error if you try to access any value fromthemeTo fix this, add optional chaining to the
theme?to ensure theobjectexist before accessing any property.
Here is an example:
import React, { useContext } from "react";
import { ThemeContext } from "./ThemeContext";

const ThemeComponent = () => {
  const theme = useContext(ThemeContext);
  return (
//add optional chaining to the `theme`
    <div style={{ color: theme?.color, background: theme?.background }}>
      <h3>Theme Component</h3>
    </div>
  );
};

export default ThemeComponent;
Typing useRef hook
You can specify the type of the referenced element by providing a generic type parameter to the useRef function.
Here is an example:
import { useRef } from "react";

const Example = () => {
  const inputRef = useRef<HTMLInputElement>(null);

  return (
    <div>
      <input type="text" placeholder="Please enter name" ref={inputRef} />
    </div>
  );
};
- In this example,
inputRefis a reference to an input element, and the typeHTMLInputElementis specified as the generic type parameter.
Let's summarize what you know
In Summary
TypeScript adds static typing to React code. This allows developers to specify the type of the data being passed around within the code.
With type checking, you wil catch type-related errors during development, not at runtime.
Code editors like VSCode with TypeScript support provides features like autocompletion and type checking.
Props typing helps specify the types of data that component expect, ensuring the component receives valid data.
You can type hooks
useState,useContext, etc to specify the type of the arguments and return values
Congratulations, you now know how to use TypeScript in your React App. For further reading check out this React TypeScript cheat sheet
